Saturday, September 28, 2013

You send my heart all a flutter ....


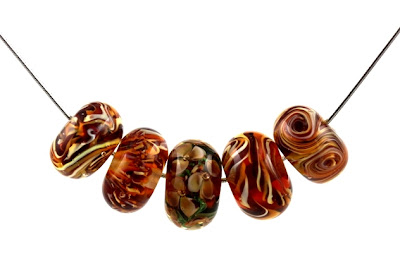
Lampwork hearts are always lovely to make.  I start by making a long barrel shape of glass with two lumps (technical term ... obviously) either side of the mandrel and heat it up until it is like thick treacle. Then using gravity I sculpt the glass into a heart shape.

I have already written a little about this heart in my post A Journey Through Love but I didn't really explain how I came about making this bead.  As you already know (mainly because I keep going on and on and on about it ....) I have been making implosion beads for a LONG time and quite by accident I turned one into a heart.  Since then I have made lots of implosion heart beads that jewellery designers have converted into beautiful pendants.    

As I have already explained, my hearts are all hand formed.  I don't use a press or mould to shape them, I rely on gravity.  This is a personal preference ... mainly because I find the whole process quite therapeutic and very rewarding.  You have to wait for the glass to move under gravity then very slowly and methodically you need to encourage the glass into the shape of a heart.  You can't rush this process, you have to take your time ... Depending on how much you manipulate the glass will depend on how much the implosion is pulled out or altered, making every bead completely unique!  There are beautiful effects that can be achieved and I have yet to explore  .... it is on my list though!

I have more hearts to show you over the next couple of months but for now if you want to keep up with  my lampwork creations you can either visit my shop on Etsy - Beadscrumptious or come and like my facebook page where I always post new beads and any offers. 

Sarah xx
www.blogpingtool.com

Wednesday, September 25, 2013

What to look for when purchasing lampwork beads ... part 1


I am a very conscientious lampwork artist.  I take a great deal of pride in my work and have always sought to make the highest quality beads.  I am a perfectionist and I will not sell any beads that I am not 100% happy with.  Each and every bead represents a piece of art that cannot be replicated or copied.  It is a moment of time trapped within the glass.

I thought I would share some examples of what makes a good quality lampwork bead. Whether you are a new lampwork artist learning your craft or someone that is looking to purchase a set of lampwork beads I hope to give you a few tips on what makes a good bead.


Take a close look at the bead holes in the picture above.  You can see that the entrance to the bead hole is smooth and rounded.  There are no jagged edges, no loose pieces of glass .... everything is smooth.  Now, this is a personal preference .... but my lampwork beads always have a smooth glass transition to the bead hole.  If I am selling my lampwork beads then I want them to be of the highest quality possible with no jagged edges or rough splinters of glass.

There are also practical reasons for this.  As you know I also make jewellery using my lampwork beads.  It is important to have a smooth transition to the bead hole ..... you don't want to have rough edges around the bead holes because the jagged pieces of glass will snap off and end up in your jewellery designs and if the edges are too rough they will eventually rub against your stringing material and wear it away.  The answer ..... to create a beautiful dimple around the bead hole with rounded edges and no sharp pieces of glass protruding from the bead.  I am preparing a tutorial on how to achieve this .... if you are new to lampwork.


Whilst still concentrating on the area around the bead hole .... another thing to look for or try to achieve if you are a lampwork artist is to completely encase the bead in clear glass.  Now, next time you are looking through a batch of lampwork beads take a good look at the internal glass surrounding the bead the hole.  Depending on the design (of course) there should be a lovely clean covering of glass right to the bead hole.  You don't want to see a murky line where the colours within the glass have bled into one another.   


Again, this is a personal preference but I prefer to encase beads fully in clear glass right up to the bead hole, as you can see in the photograph above.  It is a difficult skill to master and you can learn a great deal from tutorials and fellow artists but I think you need to find your way of doing it.  We are all different and what works for one person may not be easy for another.  It gives a lovely finish to the lampwork beads and adds a certain amount of depth.


I work very hard to make the most beautiful lampwork beads that I can.  I tend to focus more on the internal details within the beads rather than external designs and I am constantly striving to push the boundaries and make the most intricate beads that I can. It has taken a few years but I have now developed my own signature and style of lampwork beads and this is very important.  If you are a lampwork artist you need to find your speciality and develop this to make it your own.  Don't try to copy someone else's designs and sell them because you are cheating them and yourself.  Be unique, be different and be true to yourself.

I am afraid all of the lampwork beads featured in this blog have been sold.  If you would like to see more of my work then please visit my shop on Etsy - Beadscrumptious

Sarah xx


Monday, September 23, 2013

Different? ..... it's ok!


I have loads of beads tucked away in my bead box waiting to be converted into delicious pairs of earrings.  It won't surprise you to know that when I paired the beads together the only common factors were the colours I used within the beads.  I can't help it .... I get bored making the same beads all the time .... and it makes the earrings a little bit more interesting.  Also ..... I can't help feeling a little bit rebellious making earrings that don't match exactly!  


I wasn't entirely sure how people would react to earrings that weren't exactly the same so I tested the designs out on friends and family.  The response was very positive and whenever I wear my earrings I always receive lovely compliments ..... encouraged ..... I have continued to make more.  

I always make beads the same size and keep the base colour the same with accent beads that either enhance or compliment both the base and design colour.  The design, I like to vary and play around with ..... in most cases ........


This pair of earrings was based on a red, white and blue theme ...... a bit of fun .... and why not?

All of my earrings are available to purchase from my shop on WOW Thank you! Click on one of the photographs and a link will take you straight there.

Sarah xx
www.beadscrumptious.co.uk
www.hypersmash.com

Monday, September 16, 2013

Wire Wrapping Lampwork Beads.


As I keep mentioning ...... (sorry for boring you) ....  this style of lampwork beads are my signature in the lampwork world.  This is a technique that I have tinkered with to develop a style that is unique and very intricate in it's development.  All of the decoration is within the bead and every time you look into one of these beads you will see something completely different.  They are extremely tricky to make and I have many beads that end up in the flower bed .......  but I also have a lot of successful beads as you can see here.

Whilst these beads look very beautiful in a side view ..... the implosion is meant to be viewed looking straight down the bead hole ..... just like this .....

Now, usually you string the bead through the bead hole and incorporate the bead into your jewellery designs with the side of the bead being viewed.  When I made these beads I hoped to give the jewellery designer a new challenge in terms of stringing.  In my head (there is a lot filed away in there) I have quite a few designs floating around in the ether but haven't had any time to make them.  This is always the case because I get carried away developing my beads ..... striving to make more intricate, more beautiful, more colourful designs ..... I wanted to show how these beads could be strung to accentuate the intricate design within the glass.

Then, a lady called Sheena Carruthers purchased a set of my beads.  Whenever I make a sale, I always ask for a photograph of how my beads were used.  I was so proud when Sheena sent me a photograph of the pendant she had made.  It is amazing and so beautiful! 

  
It is such a beautiful piece of jewellery and is a gorgeous example of how you can string one of my implosion beads and get the beauty of the bead as it should be viewed.  I cannot make anything as beautiful as this because my wirework is certainly not to this level but over the holidays I had a go myself if only to release some of the ideas drifting around my head ..... the creative ones amongst you will understand .....


I took a length of relatively fine silver wire.  It was very pliable and needed to be for this design.  I wrapped a length of wire around another length of wire (.... does this make sense? .....) to make the loop in the centre of the bead.  I then created a wire wrapped knot because I wanted to cover the bead hole and create a pretty central aspect to the bead.  Through the knot I then threaded different lengths of wire and twisted some around to give the pendant extra strength.  Really .... I was experimenting and going where ever the wire was taking me ...... I finished off with a loop and secured the piece together with even more wire wrapping.

Here is a back view of the piece ......

You can see the wire wrapping more clearly in this photograph.  I love the effect you get from wrapping wire over another piece of wire.  It looks nice and tidy!  I have made a few more pendants using these beads and have used the wire differently to create different effects.  I have been pleased with the results but I need to get back into the studio to make some more beads as my head is spinning with more and more ideas of things to make ......HELP!

Unfortunately the jewellery I have featured in this article is not for sale but if you click on the link to my shop on Etsy, you may find a set of beads that you can turn into something truly spectacular!


Sarah xx


Wednesday, September 11, 2013

A Beadmakers Holiday!


I have been away from Facebook, twitter and my blog for such a long time, I thought I had better explain why .........  I have been on a very, very, very lovely holiday to France.  Although I have been home for nearly two weeks I am so relaxed that I can't get back into the swing of things ..... this is good and this is bad!  So I thought to try and get me over my lovely holiday I would write a few words about it and then hopefully my bead making brain will take over and I will be able to make beads again .... that is the theory anyway ..... 

So where did I go?  We went to the Midi-Pyrenees in France and stayed in a lovely place called Bouziès.  It was beautiful! We were surrounded by lovely picturesque villages perched on the edges of limestone cliffs .... just like the village of St Cirq Lapopie in the photograph.  We did a LOT of climbing and walking up very steep hills ..... but worth it because the views were spectacular! 


What I adored about this region is that is relatively untouched and has kept all the old world charms.  There are so many medieval buildings and wonderful architecture that it is a great source of inspiration for any artist. 

As I have three young children we also visited a few castles as part of our 2013 castle tour!  We saw trebuchets and medieval armour and had a fantastic time!


We found a few hidden treasures within the limestone on the banks of the River Lot, raced a boat down the canal, and visited a pre-historic cave where we saw some of the oldest cave drawings in the world.  


There were so many places that had been left untouched.  It really was beautiful and I am sure over the next couple of months I will be posting more photographs that have brought inspiration to my work.  I could write loads more about this region but I am being good and trying not to turn my lampwork blog into a travel diary but it is very difficult ......  I have also been very good .... so far and tried to keep my photographs to a minimum as I have hundreds ...... 

...... now I really must make some beads ............

One final note .... we stayed in a lovely Gite, owned and run by a very lovely family.  If you are interested in visiting this region yourself then here are some details of a lovely place to stay .....

Mr and Mme l. Foxcroft-Timms
Bajouve, 46330 Bouziès, FRANCE

Telephone : (00 33) 5 65 30 26 04

e-mail: ivanandleah@yahoo.fr

Sarah xx


Tuesday, August 6, 2013

Calypso

This bracelet holds some lovely memories of when my workspace was my kitchen. Every evening once I had packed my little children off to bed, out would come the work mate with my Hot Head torch attached and away I would go into the land of beads ..... My kiln was set up in the corner of the kitchen so I could set my beads to anneal overnight.  I would spend every evening trying out new designs, colours, types of glass, learning how they react together and just disappearing into my own little world.....

Not much has changed really .... except that now I work in my shed/studio/shed, my children are slightly larger and I am now developing my own designs from scratch.  It is still very exciting ..... and very rewarding to see the jewellery that people make using my lampwork beads.  


I remember making these beads.  I used to give myself a little challenge by selecting a few colours to work with based on something from a magazine or a book.  I have this lovely book all about underwater sea creatures.  It is beautiful (I love my books) and I love to have a peek through the pages for colour inspiration ..... Therefore, I chose Effetre pale blue, grass green, pea green, ivory, transparent emerald, aqua and a tiny piece of CIM leaky pen.  I thought that by restricting the colour palette it would focus my attention on the design ... sometimes this works .... sometimes it doesn't though .....


I started by making a barrel shaped central core using either pale blue or transparent emerald.  I gradually built up the bead by adding different colours on top of the central core until I had a rather large lozenge shaped blob on the end of the mandrel.  I added some slithers of different colours and pulled the glass whilst it was molten to distort some of the underlying layers.  Then using gravity to shape the bead I rounded off the edges of the bead holes.  When I was happy with the shape I pressed the bead against my marver and flattened the bead to a tabular shape.  Once I was happy with the shape I added the surface decoration to the bead.  To be honest, I think I kept it all quite simple using raised dots to mimic bubbles and underwater plant life .... it was good fun!  You can't always tell what your beads are going to look like until you remove them from the kiln but this time I was really pleased because they came out of the kiln exactly as I wanted them to.


I was really pleased with the internal swirls created when I distorted the molten glass.  It created the effect of swirling seaweed trapped within a glassy ocean.  The surface of the beads are very tactile and the raised dots give the impression of water droplets still clinging to the surface of the beads.

I had decided before I had finished making the set of beads that they were going to be part of a bracelet.  A very bright and vibrant bracelet.  The tabular beads measure approximately 1 inch and because the design is so busy they needed to separated by plain, simple beads.  The finished bracelet measures 8 and a half inches and is finished with a sterling silver toggle clasp.    

This bracelet is available to purchase from my shop on WOW Thank You.  If you click on a photograph, a link will take you straight there.

Sarah xx

Friday, August 2, 2013

Lavender Moss


Hello, I have been lost in the beautiful British summer over the last couple of weeks.  I did have a bad spell of not being able to make a single round bead, my creativity had vanished somewhere in the ether and I can't help it .... once that sun comes out I just can't focus! It must be the excitement of actually having good weather .... I know I harp on and on about the weather but really it has been truely depressing over the last 12 months ...... well until now!

My laptop was also on it's last legs so my very wonderful husband (he reads these) and he is the most amazing husband in the whole wide world ... bought me a very nice shiny new one.  It is great! It starts straight away.  Usually I can make breakfast, hoover the house, put on a few loads of washing, make five sets of beads and then the password request will appear.  Not now though .... this machine is instant.  I must admit, it takes a while for me to get used to new technology (unlike my kids) and I have taken ages to transfer my work across (... might also be due to watching The Returned at the same time... totally addictive) but I am finally ready to go.


I have been very good at promoting my shop on Etsy and to be honest I am wondering if it might be more sensible to concentrate on having one shop. I currently have a shop on Etsy, Folksy and WOW Thank You.  Folksy is basically a British version of Etsy and my original thinking was to advertise myself in both places and spread the word about Beadscrumptious Beads around the globe ... a little.  What I am not good at is promoting my work on Folksy.  So, I thought I would rectify this today and post about this pretty set of lampwork beads.


This set of beads was made using a very pale green coloured glass.  It is a very subtle and calming colour so I needed a contrasting glass that was rich, vibrant and "in your face" to balance things out.  The colour I chose was CIM Lapis, one of my favourite coloured glass and beautiful to work with.  The contrast between the two colours is very striking so I was careful to keep the design's simple.  By doing this I have managed to keep the calming influence of the pale green glass.  A great deal of thought goes into these beads you know ........ 


Since writing this post I have decided to close my shop on Folksy for the time being but you can purchase my lampwork beads from my shop on Etsy.  If you click on one of the photographs a link will take you straight there.

Sarah xx


Wednesday, July 31, 2013

Monthly Make - July


I haven't had time to write a monthly make post for May or June which is a bit of a shame.  Never mind, I am back on track with an entry for July.  I am one of those people that like to get value for money when I make a purchase and this is something I always try to fulfil with my customers too ...

My lampwork beads are expensive (because they are made to a very high standard) and considered a luxury item so I always try to make sure I include a little extra where I can.  It is also lovely when you receive a beautifully packaged item.  So, when you purchase my beads you can always be assured that you will receive your beads in a beautifully presented gift box, tied with ribbon and finished with a few little extra beads.


I take absolutely ages packaging my beads.  They take a long time to make, kiln anneal and clean and I would be devastated if they were damaged during shipping.  Especially as many of the designs I make I cannot (no matter how hard I try) reproduce.  They are unique, one of a kind pieces of art!   I also take ages choosing the right beads to place on the top of the box.  You need beads that match the beads you have purchased to incorporate into your jewellery design.

Underneath all of the reams of bubble wrap, you will have a beautiful set of lampwork beads arriving in pristine condition ready for you to turn into something beautiful.

Oh ..... I should also add that I would love to see what beautiful pieces of wearable art you have made with my beads.....

I have a shop on Etsy where you can view and purchase some of my lampwork creations.  All you need to do is click right here ..... Beadscrumptious on Etsy

Sarah xx

Thursday, July 25, 2013

Static : A lampwork Bead Set by Beadscrumptious


I can't believe that I didn't get around to writing a blog post about these beads before they had sold on Etsy.   So, I am going to write one now.  I will reflect on this lovely set of lampwork beads that are making their way to a new home.

This set of beads are an example of my signature implosion beads and actually started out as an experiment to see what would happen if ...... and these beads were the result.  They also marked a change in my implosion designs where I started to really define myself in the lampwork world as having designs that I had developed.  People will and do try to copy my designs but hey, that is life! These things happen when you start to promote yourself.  Should you lock yourself away to keep all of your work top secret or should you embrace the fact that your work is inspiring other artists?  I am forever the optimist! .... although it is disheartening when you see very similar beads to your own being sold much cheaper .... I take a great deal of pride in my work and make high quality beads to a very high standard (blog post coming soon).


I am spending the next couple of weeks developing these beads further.  I am going to try different colour combinations and a few new techniques to see what happens.  What will my end result be and will any of the beads I make be worthy of writing about? .... we will see!  I also have to make a large batch of similar beads for a commission.  I say similar because I find it very difficult (actually impossible) to make the same bead twice but that is another blog post entirely!


I am really looking forward to seeing what the lovely lady who bought these beads is going to make with them.  It always makes me feel like a proud parent to see my lampwork beads incorporated into some amazing jewellery designs.  That is also another blog post to come very soon .....

If you click on any of the photographs a link will take you straight to my shop on Etsy where you can find some more examples of my lampwork beads to feed your imagination and hopefully inspire your jewellery designs.

Sarah xx

Monday, July 22, 2013

Beadscrumptious Implosion Flower Beads

Hello, and welcome to my new blog followers.   I feel as though I have been away for a very long time .... I had one of those moments where all of my creativity just vanished.  It returned in part ... I had moments where ideas were buzzing through my head but I just couldn't make them.  No matter how hard I tried I couldn't make a single round bead.  So, I admitted defeat and left the shed/studio/shed, bought myself a new laptop (my old one was very old and ... well ....  just old!)  and spent the last week transferring across all of my data.  Why am I telling you all this boring information?  I have absolutely no idea but there we are ...... 

What I wanted to write about were my new implosion beads.  YES!  My lampworking hands finally returned and I was on a roll!  I went into a lampwork frenzy!  I abandoned my family duties and disappeared to my shed/studio/shed ..... until I made all the beads that had been whizzing around as ideas in my chaotic brain.  Yipee! Whoohoooo! and Hooray! 


If you are a regular reader of my blog, you will know these are my signature beads.  I have spent years developing these beads and continue to do so.  They are very difficult beads to make and require a great deal of heat control, concentration and a very steady hand.  I also need to have a clear head to make them because they are totally absorbing. 


So what is new about these beads? .... I have been developing the side view of the beads.  The beads are designed to be viewed from the front but many designers want to have the detail around the side of the bead as well.  Sometimes this happens and sometimes it doesn't, so I have been developing a technique that can achieve this.  I have also been developing a greater depth within the beads, more intense colours and more swirling within the swirls ... just thinking about these beads sends my head into a spin ..... I want them to be even more stunning and to really capture your attention when they are worn as a piece of jewellery.


As you can see from the photograph above, I decided to use these beads to make a series of pretty pendants.  I am always asked about how these beads could be converted into beautiful jewellery so I thought I would show you a very simple example.  I made this pendant using sterling silver wire.  I created a little knot of wire to cover the bead hole and then looped the wire carefully around the bead so that it will hang correctly from a silver chain.  A great amount of thought goes into my jewellery designs because I want my customers to be complemented on their beautiful jewellery and spread the word about my lampwork beads.

I will be making some more implosion beads very soon and they will be available to purchase in my shop on Etsy - Beadscrumptious

Sarah xx

Thursday, July 4, 2013

A simple way to wear lampwork beads!


You have seen a beautiful set of lampwork beads and don't know what to do with them.  Well, here is a very simple solution to your problem ..... pop them onto a sterling silver chain and you have a very quick and simple item of jewellery.  The great thing about this is that you can change the beads very easily to match different items of clothing within your wardrobe.  This is something that I do very often.  


I quite like the simplicity and versatility of this.  I can wear one bead, a set of beads, mix and match them with other sets of lampwork beads and create statement peices of jewellery that I know I will be complimented on and that no-one else is wearing.

You could purchase some sterling silver rondell or round beads to place in between each lampwork bead to bring out the designs within the beads.  This creates a very effective look as well.  I love using sterling silver with lampwork beads and keeping things simple because it compliments the designs within the lampwork beads. 


Photo by Vicki Ritherdon


When you are purchasing your silver chain just make sure that the end is smaller that 2.5mm and rectangular in shape.  I do have sterling silver chains available should you wish to make yourself a statement piece of jewellery.  All you need to do is contact me. 


If you would like to see more beads that you could place onto a sterling silver chain .... please visit my shop on Etsy by clicking on this link -  Beadscrumptious


Sarah xx
www.beadscrumptious.co.uk
www.hypersmash.com
Hypersmash.com