It was one of my friend's 40th birthday last weekend and I wanted to make her something special. It is a very special birthday after all! I am always admiring her hair because she is very lucky to be able to dye it fantastic colours. Usually amber/red/orange colours. When I think of her, this is the first thing that springs to mind. The colour amber. I spent a lot of time thinking about what to make her and what colours to use. Then I remembered this lampwork bead set. I made these beads last year and was about to re-list them but changed my mind because they had all the right combination of colours .... lots of amber to bring out the colour of her hair, a contrasting colour of vibrant teal and ivory to tone the bright colours down a little ..... not too much though ....
As you can see from this photograph I had an interesting set of beads to work with. Different shapes, styles and colours. The trick is how to put all of these together to make a beautiful piece of jewellery. What did I do? I am going to tell you right now ......
I had a search through all of my jewellery making materials as you can see from the photograph above. I wanted the main theme of the necklace to be centered around the colour amber (My friends hair colour) with accent and contrasting colours of teal and ivory. So, I needed thread, seed beads and extra lampwork beads to match.
I started with the largest lampwork bead. This is going to act as the focus of my necklace (the centerpiece). I have placed a plain teal coloured bead either side of my focal bead. The teal colour will help to bring out the colours within this bead. Either side of these beads I have placed a couple of decorated lampwork beads and finished this group off with a couple of clear amber coloured beads.
I decided to double strand these beads (you will see why in a minute). I used an equal length of olive and brown tigertail. I placed the beads in the center of the two stands and built my necklace from this point.
I needed a method to keep my beads in place, which is one of the reason I used two strands of tigertail. I placed an emerald coloured seed bead onto the olive tigertail and a brown coloured seed bead onto the brown tigertail. To lock these in place I then placed a brown seed bead through both strands of tigertail.
As you can see from the photograph, the seed beads make a pretty cluster either side of the lampwork beads and have the effect of locking the beads in place so they don't move up and down the strands of tigertail.
I built the necklace up from this central point. Making sure I added the same amount of beads to each side. I should also mention that to keep the lampwork beads in place I placed the rest of the seed beads though both strands of tigertail.
I continued to build up the necklace and used the seed beads to lock my lampwork beads in place. I made a couple more clusters using the decorated lampwork beads separated by seed beads until the necklace was of the desired length. I made a long necklace because my friend is tall and very slim and I thought it would look great on her. A great deal of thought goes into my designs especially when I am designing a peice of jewellery or making a bead for someone in particular.
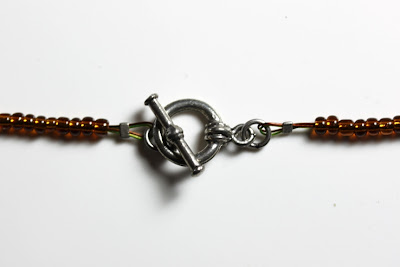
I couldn't decide at first if I was going to use a lobster clasp or a toggle clasp. I decided on the toggle in the end because it suited the style of the necklace.
I was so carried away with finishing the necklace that I didn't take any photographs of this part of the process .... sorry! But, I have explained this in more detail in another blog post - Making your own jewellery!
Lovingly finished with a toggle clasp! But, what does the finished necklace look like?
I wanted to show you how you can take a set of my lampwork beads, combine them with other materials to create a beautiful piece of jewellery. I also hope this blog post inspires you to start making jewellery, even if it is for yourself. It is a lovely hobby and it gives you the opportunity to make your own unique jewellery. Items that no-one else will be wearing and that people will compliment every time you wear it.
So, to finish ... what would you make with this set of beads? If you are a regular reader of my blog then you will already know that I am a lampwork artist and make all of the lampwork beads featured in my blog posts. I make them all using my own hands in my studio. All of my beads are made to a very high standard. They are all kiln annealed to ensure long lasting life and durability. I also clean the beads thoroughly to remove all traced of bead release. If you would like to see more of my work then you are most welcome to visit my shop on Etsy - Beadscrumptious on Etsy!
Sarah xx


Love your beads Sarah, they are amazing to look at.x Michelle
ReplyDeleteThank you Michelle, you are very kind. xx
Delete